
Time Unplugged
Excluding my first real computer, the Commodore 64, every computer I've used since the 80's has had a real-time clock (RTC). It's so ubiquitous that I didn't know that it was a thing. So when I discovered the Raspberry Pi didn’t have one, my first thought was: Wait… what?
When the Raspberry Pi boots, the time resets. To figure out the correct time it connects to the internet and uses Network Time Protocol (NTP) to determine an accurate time. Without an internet connection, there is no accurate time. The alternative is an RTC that provides that accurate time without an internet connection.
We could rely on an internet connection instead of an RTC, but that adds complexity and doesn’t align with the Accessible Simplicity element in our decision framework. From a user’s perspective, it’s not obvious why internet access is needed. At best it would create expectations towards additional online features, and at worst would be too confusing to set up for some people.
Which RTC To Use
Being a critical component, I spent far too long learning about RTC's. There's lots of considerations, the most iteresting of which (to me) are:
- How long will the battery last?
- How accurate is the clock over time during a power outage?
- What is a realistic "life" of the battery?
- Can you charge the battery when the Pi has power so we never have to change it?
| Model | Accuracy (Drift per Year) | Battery Type | Approx. Price |
|---|---|---|---|
| DS3231 | ±2 minutes | CR2032, ML2032, LIR2032 | $3 - $5 |
| |
|||
| PCF8523 | ±5 minutes | CR2032 | $2 - $4 |
| RX8900 | ±1 minute | ML2032, LIR2032 | $5 - $7 |
Most DS3231 modules have a built-in charging circuit, but you should confirm yours. If it does, you cannot use a CR2032 battery, as it may overheat and leak. You must use a rechargable LIR2032 or ML2032 instead. Alternatively, you can disable the charging circuit, but this is beyond my ability at this point.
Important Future Me Discovery:
The DS1307 operates its I2C bus at 5V, while the Raspberry Pi expects 3.3V. This isn't always a problem if the DS1307 is the only device on the bus, but when adding multiple I2C components (like we will be), the voltage mismatch can cause conflicts and unreliable behaviour. This relates to the pull-down resistor stuff we figured out in Buttons and LEDs. From what I can find online, many people use DS1307's in their Pi project and don't worry about the voltage issue, which is what made this so confusing for me to figure out.
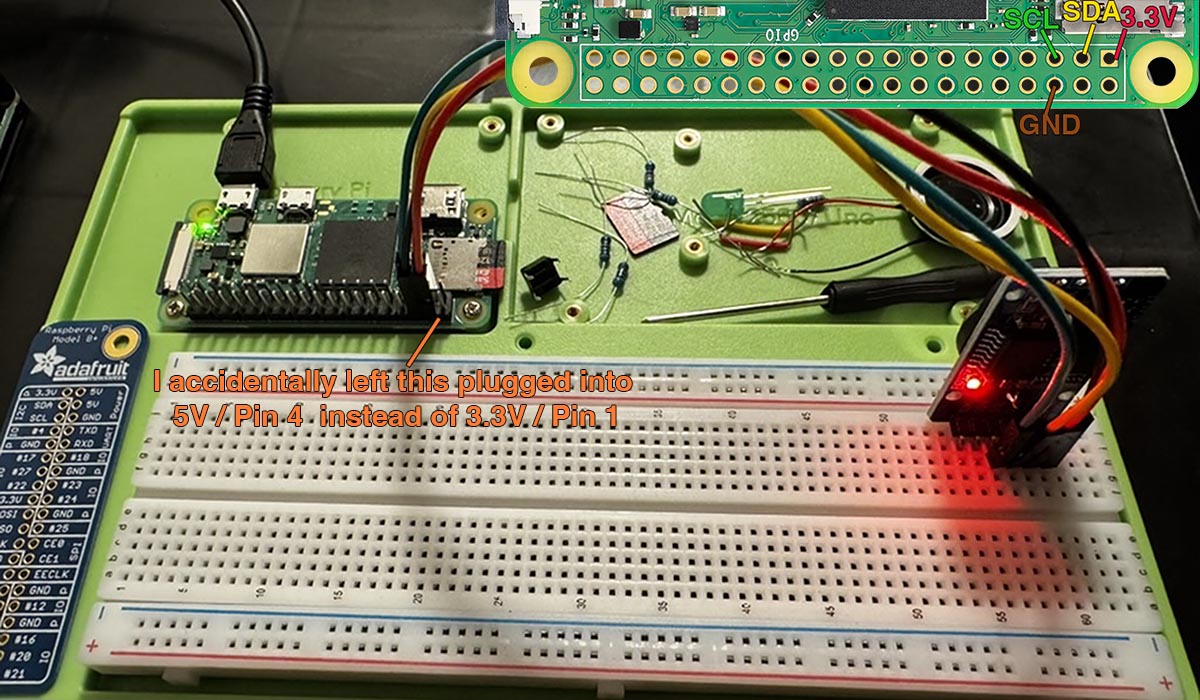
RTC DS3231 Wiring Guide
The RTC module has soldered pins which are inserted directly into the breadboard, spanning from row 55 to row 60. Each pin will be connected to the appropriate GPIO pins on the Raspberry Pi using jumper wires to the appropriate row.
The pins on the RTC board that I’m using are labeled (from rows 55 → 60) as 32K (55), SQW, SCL, SDA, VCC, and GND (60). We are only using SCL, SDA, VCC, and GND, while 32K and SQW remain unconnected.
Wiring instructions are ordered as breadboard rows from 60 to 57 for the four pins we're using:
- BLACK: Plug a wire from GND / Pin #6 on the Pi to the GND pin of the RTC (row 60).
- RED: Plug a wire from 3.3V / Pin #1 into the VCC pin of the RTC (row 59).
- YELLOW: Plug a wire from SDA / Pin #3 to the SDA pin of the RTC (row 58).
- GREEN: Plug a wire from SCL / Pin #5 to the SCL pin of the RTC (row 57).
Implementing on the Pi
This was anticlimactic. Getting it working involved no code, just a bunch of configuration (my favourite). So of course I built the configuration into Bootstrap.

To avoid being repetitive, reference the Remote Coding on how to deploy the configuration to the Pi.
Once deployed, it just worked. The wizards at Raspberry Pi already set everything up in the Pi OS so that it will seamlessly use RTC or NTP based on what's available. The deploy script jumps through some hoops to ensure that the RTC clock is set to the most accurate time possible based on the connection protocol during deploy.
Next Steps
Hello Sound. I bounced around between the RTC and the Audio a few times as I had to re-order new hardware to eventually get them each to work. In this next step, after scrapping the PAM8302A, I finally got it working the way I want with a MAX98357 Amplifier Breakout.
Next Up: Hello Sound